Wild fermentation is wild indeed
Making ginger beer is incredibly easy, most of what it takes is time, first waiting for the ginger bug to get started and then leaving the bottled product for a few weeks to ferment before drinking. In fact it seemed so easy that as I looked at the bottles sitting on my kitchen counter I could not believe they contained anything worth getting excited about. I shook them and peered at them to see if there were signs of carbonation but all i really saw was a little bit of sediment floating around in the liquid. I was so sure they were going to be disappointing that I delayed opening them for quite some time after the two weeks required for the ‘beer’ to ferment. Finally I cracked open a bottle, and with a celebratory pop and fizz the ginger beer proved me very wrong. This certainly is a drink to get excited about. It feels like a bit of magic actually getting all that complex flavor and all those bubbles out when so little went in.
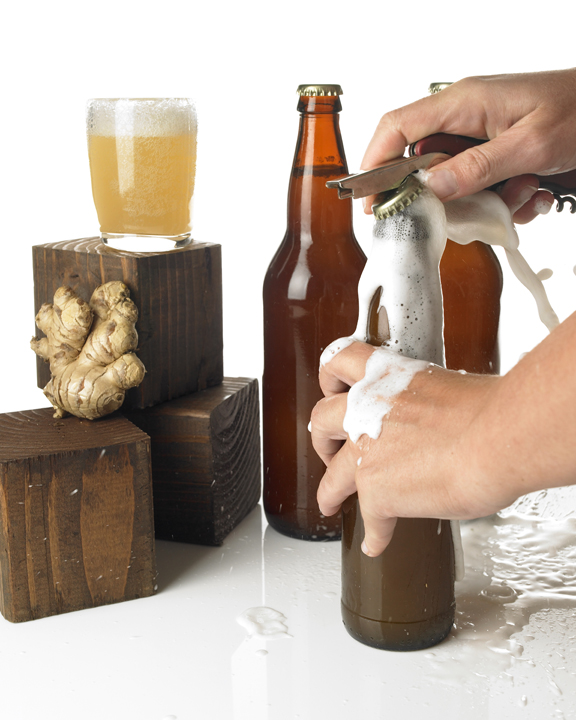
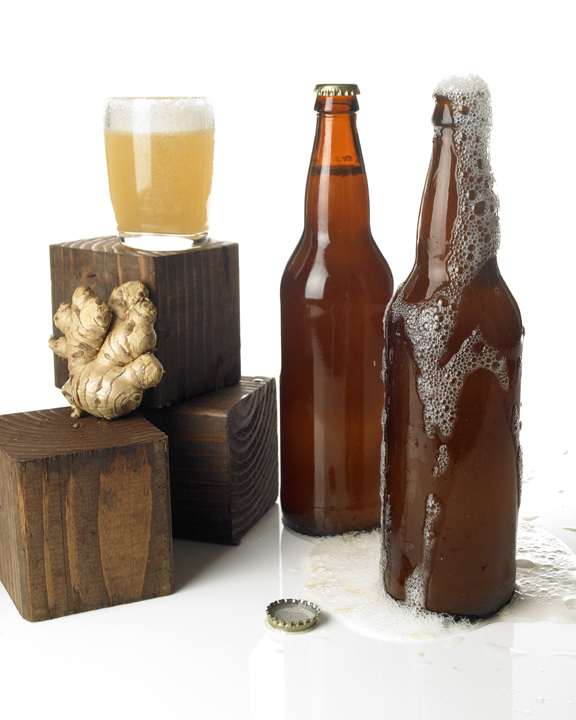
Indeed contrary to my expectations, the bottles quite ‘fizzethed over’ when I opened them. I should have expected this, I suppose, since the recipe included a warning note to just that effect, which I clearly paid no attention to. So I’m taking this chance to let you know, the carbonation will be strong. And if you are lucky enough to be friends with a professional photographer who agrees to spend a day taking photos with you for your blog, you should be extremely wary of opening a glass of homemade hooch onto her extremely expensive lens. In any event, I don’t think any lasting damage was done to either the lens or the friendship, and as you can see from the photos, the day we spent with Tamara Staples in her studio was very productive indeed!
I got the instructions for making the beer from Sandor Katz’s fabulous ‘Wild Fermentation’, a book which I highly recommend both for its simple instructions in making all things fermented, from sauerkraut to vinegar as well as for the inspiring and informative tone which leads you to want to turn your kitchen into a veritable laboratory full of bubbling and fermenting potions. I’m planning to work my way through much more of the book, though I fear I may get sidetracked by the need to make constant batches of ginger beer.
The first transformative step is to make a ginger bug – a simple mixture of sugar and grated ginger in a cup of water which is left open to the air to soak up the local strains of yeast. Sure enough after a few days the mixture was foamy and bubbly and then I just kept feeding it until I was ready to make my magic drink. Talk about local eating, not even the strawberry planters at the front door can hold a candle to the locavore street cred of harvesting little yeasties right in the kitchen. I’d continue to wax lyrical about the whole process but its just past 5pm and the time is right for a dark ‘n stormy, so I’ll have to leave you now!
Ginger Beer
- Gingerroot for the ginger bug + 2-6 inches of ginger root for the beer
- Approximately 2 cups sugar
- Juice of 2 lemons
- Water
First start the ‘ginger bug’ by adding 2 teaspoons each of grated ginger (skin and all) and sugar to 1 cup of water. Stir well and cover the mixture with cheesecloth to keep out the bugs and leave the mix in a warm place. Add the same amount of sugar and ginger each day or two until the mixture starts to bubble (mine took just three days) and then continue to ‘feed’ the bug until you are ready to make the beer
Boil 2 quarts of water and add the grated ginger (2″ will yield a mild ginger flavor, 5″ will be pretty intense, which is what I did!) and 1 1/2 cups of sugar. Boil for 15 minutes then allow to cool
Once the mix is cool, strain out the ginger and add the lemon juice and the strained ginger bug (if you are going to continue making ginger beer continuously you can keep a few tablespoons of the active bug as a starter and replenish it with more water, ginger and sugar). Add enough water to make 1 gallon.
Bottle in sealable bottles (even recycled soda bottles will do, but beer bottles with swing tops are great or get a bottle capper and use regular beer bottles). Leave the bottles to ferment in a warm spot for at least two weeks, then refridgerate before drinking.
–By Talia




WOW.
i got that book from the library last week. a library notoriously lacking in any good natural/organic/vegan type books. the week prior, i had taken a picture of it in the bookstore to remember how awesome it was.
yesterday, i started up both a fermented garlic pickle and a strawberry peach t’ej. both are variations from the book.
then lo and behold, i see your post on foodgawker!
talk about good things in threes.
it sounds divine, as i LOVE the flavor of real ginger!
i know what i’m making next ;3
i’m so glad you managed to get that book out the library: it really is special. and i’m also really glad you found my post – you’ll certainly be glad of the ginger beer when you make it. Hope to see you back here often!
Wow! Tantalizing photos as I’ sure you know (smile). I want a ginger beer made from yeast in my kitchen…
Thanks Stella. I’m glad you like the photos: its really fun to work with a pro!! I hope you get to have some Chateau Stella Ginger Beer soon!
Delicious! My partner has just started making homebrews, and his second mix was a ginger beer. He can’t wait to make it from scratch, so this is a recipe he’ll definitely be seeing! Yum, I love ginger beer. Thanks for sharing.
Such fun to be starting with new homebrewing – i’m just waiting for the weather to cool down to do my first beer myself! I am finding the beer a little daunting with its gallons of product and I think the ginger beer is a great gateway brew!
I met Sandor at a food conference a few weeks ago… he was quite a character and a real prophet for capturing the wild beasties in the air for food. He gave great tips on sauerkraut and really made me want to get his book. This looks just great… can’t wait to try it because ginger beer is one of my favorites (Savoy in NYC made a great one). Thanks for sharing your experiment.. .great action photos!
oh, how fun to meet sandor: i can just imagine from his writing what a total character he must have been, lucky you! I hope you get the book and try some of the recipes!
I made ginger ale not too long ago and this seems to be my most likely next project. I’ve got to track down some bottles though. Thanks for sharing. The photos are awesome!
how was your ginger ale? i’d like to try that too! i have a standing invitation to friends to save good bottles for me, but i haven’t gotten much 😦
Wow! Awesome pic! Mine still didn’t achieve the huge carbonation that yours did, but I’m really surprised how a couple weeks in the fridge made a vast improvement! I’m starting a new batch right now!!!
my new bug is on the counter getting buggy! i wonder what it is about the cold that creates all that fizz… i need to take physics for mixologists or something!
I’ve been lucky enough to taste Talia’s gingerbeer and it is very delicious. Best thing to do is mix in a couple shots of high-quality rum and have yourself a dark and stormy.
i’m going to have to buy me some good quality rum 🙂
I have been waiting until I had a stretch of time free to make my ginger bug… but I’m getting even more excited now. Lovely pictures… and I’ll bet the finished product was mighty tasty! I know I’m very much looking forward to homemade “ginger bombs” with my beer!
i’ve never had a ginger bomb: i had to look up what it was, sounds exciting! i’ll have to try some myself.
The reason cold liquid holds more fizz than warm is because more gas can be dissolved in the cold liquid. When a liquid is warm, the molecules are moving around more quickly therefore “kicking” the gas molecules out of solution. When it is cold the molecules move more slowly and are less likely to “kick out” the gas molecules. It is the same reason a cold can of soda seems more fizzy than a warm can right after opening it.
Of course as I’m sure you know, don’t put it in the fridge until fermentation is complete or else you won’t get any bubbles!
I hope this was informative 🙂
Ginger beer is definitely a favourite in our house…..hmmm if i give this a go my husband will love me forever! fingers crossed! Beautiful pictures by the way.
i highly recommend an evening of ginger beer and dark and stormies with the neighbors. i just got upstairs and i can barely type 🙂
The carbonation sure is wild! I tried this recipe, and after keeping the bottles in room temperature for about a week, one of them exploded. Came home from work to find shards of glass and splatter 10 feet away. So to be on the safe side, I’d recommend keeping the bottles in a plastic bag 🙂
I just bottled a 2-liter of this (following the exact directions) last night, and the bottle is rock-hard already. It’s been less than 24 hours. Are you sure about the “at least two weeks” part of this recipe? Without an airlock, I’m pretty sure that bottle’s going to blow.
well it worked for me with no problems, and definitely no airlock, and the recipe comes from a very reputable source so I hope it worked out for you. maybe the bottle needs a little more headspace?
Just bottled my first batch tonight and am very excited to try it.
I’m nearly two weeks into my fermentation. I have been tasting a long the way – fun to see it progress. Um, your photos are awesome – I hope I get that many bubbles. I have about two inches of sediment – did you have that too?
I had some sediment, but I just ignored the last bit of beer in each bottle and it was ok!
my brother is a big ginger beer fan, this sounds so easy i think i might just HAVE to try it! great photos!!
I hope you do!
Alright I’m at the 2 week mark today, but my beer seemed only slightly carbonated so i’m going to give it another week and try again. did you hav any trouble with mold on yours? A few of mine have some mold spots so I just poured them out and figured the rest would be okay…thoughts?
I have not had any problems with mold. Maybe if you are having trouble with that you should sterilize your bottles before getting going. As for the amount of carbonation: its hard to tell until after they have been in the fridge but of the various batches I made I definitely noticed differing amounts of fizz – the warmer the weather when I made the beer the more carbonation there was… i’m actually waiting a few more weeks to get a batch going so that its nice hot summer weather over here!
What kind of sugar are you using? I had the same thing happen to me twice, and in both instances I was using organic, evaporated cane juice. I later read in an article about Kombucha that refined white sugar is best for growing cultures, and when I switched to white sugar, the bubbles happened very quickly and with no mold. Apparently the yeast has a much easier time growing in sterile, pure, white sugar than the more natural sugars that might retain antibiotic defenses of the sugar cane plant.
Doug: thanks, thats great information. And one (rare) point in defense of processed foods…
How much bubbling should be taking place on the “bug”?
Hard to quantify: but its definitely noticeable: the texture of the bug looks different, sort of frothy. I’ve noticed with mine that the most bubbling happens within two days and then as I feed it it remains relatively yeasty but is dialed back from the original froth. Its always worked though once I made the beer. (the temperature of the space has a huge impact on the yeast, i have typically made mine when its pretty warm out: and when its very hot I find the whole reaction is too quick and the taste not as developed). It might take a little longer for the yeast to develop in winter.
Great photos and information. Other recipes I’ve seen had a first fermentation, either just covered with cloth or with an airlock, and then a second in the sealed bottles – it it correct that this one goes right into the sealed bottles? (I mean, once the “bug” is fermented). I realize this is an old post, so thanks for any info…
Oh, and if you’re in a state that has glass bottle returns, check yuppie and health food stores for bottle returns of swing-top bottles – these stores often sell sparkling lemonade and such in swing top bottles that are fantastic for this – and will let you buy the empties for the bottle deposit price – better than drinking a bunch of Grolsh beer just for the bottles!
Cindy:
Yup: Just the bug and then straight into the bottles: its really very easy! The beer definitely ferments well in the bottles (the amount of fermentation is very dependent on the air temperature I’ve found so in winter you might want to leave them a little longer before you refrigerate).
Good call on the bottles: I’m surrounded by hipster healthfood stores here in Brooklyn so I’ll give that a try.
This sounds amazing! The recipe I’ve been using is much quicker and adds yeast directly to the mixture, but I was never really satisfied with the intensity of the flavor. I’m really looking forward to trying this one instead! 😀
Great to see this recipe getting love elsewhere! I’ve just posted a challenge/giveaway, to see how many varietals people could make with this. Personally, I’m dying to try adding some rhubarb. 😀
Thank you for the nice pictures and motivating text, I have the wild fermentation ebook and it is really nice. I’m thinking to add some green tea for a extract nice taste maybe some japanese sencha tea. Kind regards from The Netherlands !
Just bottled a batch last night and don’t know how I’ll possibly be able to wait 2 weeks!
Do the bottle caps need to be on very loosely, or will this reduce carbonation? I used a few GT’s kombucha bottles, some small carboys with plastic/rubber caps, a juice bottle with a metal cap, and a big glass pitcher with a rubber gasket lid.
This is my first time with a beverage ferment, but I know that you need to do this for vegetables.
Thanks!
Help I have tried this twice with little to no carbonation after 2 weeks! Can someone suggest why? I think I am doing this exactly. I have a few bubbles and it takes nice but no exploding foam!
Yep! Works better than expected. Here’s another take on the same process.
http://www.betterdoneyourself.com/2014/05/29/homemade-ginger-beer/